Category Archives: Wouldn’t U Like 2 B A Foodie, 2?

Tasty Tuesday: Such a DIP!

We like to entertain here at Boystown.  Even if we’re only having a couple of friends over for dinner, its still an occasion to whip up something awesome- not just order a pizza.

Not that there’s anything WRONG with pizza.  I’m a big pizza fan- huge!  And -if we’re being honest here- there are times when pizza just sounds DANG good and nothing else will do.

But when I’m having friends over, I aim to impress them with my culinary skills- not my INSANE ability to order out.

Sometimes, though, it can be a pain and OH-so-expensive to go all out with homemade goodies, and, the more the people, the more expensive.

Like New Year’s.

It was SUPPOSED to just be a small thing- just a couple of friends.  Nothing big.  It was practically an after thought, anyways.  Why go through all the trouble of making a lot of food for a couple of people?

But the problem is, we don’t just HAVE a couple of close friends.  We have what we like to call “our crowd”.  They’re the people that we invite to everything, and you can’t invite just a couple of them without inviting the rest.  What makes it better (or worse?) is “our crowd” keeps growing every year.

So, what do you do for a huge crowd, that isn’t pizza, that doesn’t break the bank, but that stills calls out “Made from scratch!”?

I didn’t know either so I went on -that’s right- Pinterest.

After scouring the boards, I came up with the conclusion that everyone likes dips.  Its one of the favorites to order at restaurants, they’re usually the first things that disappear at get togethers, and *BONUS* they’re usually cheaper than buying tons of meat appetizers and other food items.  Plus, they aren’t hard to put together.

The dips I chose were all pretty easy to do and, just like I figured, they were a hit.  Hopefully they’ll be a hit for you, too.

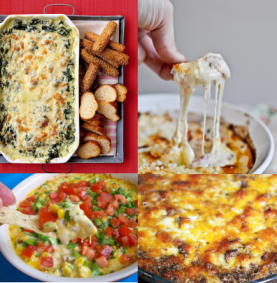
Hot Spinach Dip (check out the original HERE)

Ingredients

  • 2 teaspoons olive oil, plus more for baking dish
  • 1 medium onion, diced
  • 3 garlic cloves, minced
  • about 1-1 1/2 lbs of spinach leaves, rinsed and dried
  • 1/2 cup milk
  • 6 ounces reduced-fat bar cream cheese
  • 3 dashes Worcestershire sauce
  • 3 dashes hot sauce, such as Tabasco
  • 3/4 cup shredded mozzarella
  • Coarse salt and ground pepper
  • Baguette slices, breadsticks, or crackers, for serving

Directions

  1. Preheat oven to 425 degrees. In a Dutch oven or large pot, heat oil over medium. Add onion and garlic; cook until lightly browned, 5 to 8 minutes.
  2. Add spinach in two additions, letting the first batch wilt before adding the next; cook until completely wilted, 5 to 8 minutes. Transfer to a colander; drain, pressing to release all excess liquid.
  3. In the same pot, warm milk over high heat. Whisk in cream cheese until melted, about 3 minutes. Add spinach, Worcestershire sauce, hot sauce, and 1/4 cup mozzarella; stir to combine. Season with salt and pepper. Pour into a lightly oiled 1 1/2-quart shallow baking dish; sprinkle with remaining 1/2 cup mozzarella.
  4. Bake until bubbly and golden brown, 20 to 25 minutes. Serve hot with accompaniments, as desired.  I made some herbed foccacia bread, but only because I have a bread maker and it did all the work for me for the most part.
Hot Corn Dip (check out the original HERE)
This was a FAVORITE among everyone, and it tasted great reheated the next day, too.

Ingredients

  • 2 cups shredded chedder cheese
  • 1 cup shredded Montery Jack
  • 2 tbs chipotle peppers in adobo sauce, diced small
  • 1 small can (4oz) diced green chilies, undrained
  • 1/2 cup Mayo
  • 1/4 tsp garlic powder
  • 1 11oz can of corn, drained
  • 1 small tomato
  • 2 tbs cilantro, chopped
  • 2 tbs green onions, sliced thin

Directions

  1. Preheat oven to 350 degrees.
  2. Mix the cheeses, chiptole and green peppers, mayo, garlic powder and corn together. Pour into an oven safe dish.
  3. Bake 20 minutes or until golden brown and bubbly
  4. Top with diced tomatoes, green onions, and cilantro. Serve immediately with tortilla chips
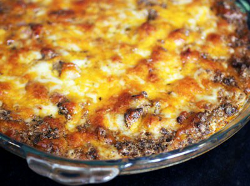
Spicy Chorizo Dip (check out the idea for this HERE)

Ok, so this dip was SUPPOSED to be a Taco Dip, but a funny thing happened on the way to my pantry- I realized I’d forgotten to buy the ingredients I needed.  No worry, though- I switched it up a little and made a HUGE hit.  I had one of our friends gushing… repeatedly… over and over… how I needed to give his wife the recipe.  And I could have written off his compliments as due to the vast quantities of alcohol he was consuming, but everyone else seemed to love it, too.  Its a bit on the spicy side, so if you are sensitive to that sort of thing, you might want to steer clear.

Ingredients:

  • About a pound of chorizo (I used 2 links that had 9 oz. each)
  • 1 medium onion, diced
  • 3 cloves garlic, minced
  • 8 ounces light cream cheese, softened
  • 1/2 cup light ranch dressing
  • 1 tablespoon chili powder
  • 1 teaspoon ground cumin
  • 2 ounces cheddar cheese, shredded
  • 2 ounces pepper jack cheese, shredded
  • 1 1/2- 2 cups of refried beans (if you have pinto beans on hand, you can always follow this recipe HERE, without adding all the spices it calls for.)
  • Tortilla chips

Directions:

Preheat the oven to 400°F.  Spray a 9-inch pie plate with cooking spray and set aside.

In a skillet, cook the chorizo until completely done.  I just followed the directions on the links which said to cook the meat for about 10 minutes, but see what your package says.  Add the onion and garlic, and cook for 4-5 minutes.  Remove from the heat.

In a bowl, combine the cream cheese, ranch dressing, chili powder, and ground cumin.  Add the chorizo and half of the shredded cheese.  Stir to combine.  Add 1 1/2 cups of refried beans and taste to see if you want to add more.  The beans just cut through some of the spice.

Transfer the mixture to the prepared pie plate, and sprinkle with the remaining shredded cheese.

Bake for 15-20 minutes until the cheese is golden and bubbly.  Serve with tortilla chips.

White Pizza Dip

This was -by FAR- the favorite of almost everyone.  Its gooey and cheesy and completely drool worthy.  Just make sure you have a mini-crock pot or something that you can put this in to help keep it warm, because its MUCH better when its warm and gooey and… I might have to make some more tonight.

Ingredients

1 pint grape tomatoes, tomatoes cut in half (if you don’t have grape tomatoes, I’m pretty sure you could just diced a couple of tomatoes into 3/4 inch chunks (enough to make a pint) and roast that.)

1 teaspoon olive oil

1/4 teaspoon salt

1/4 teaspoon pepper

1 1/2 (12 ounces) blocks cream cheese, softened

8 ounces mozzarella cheese, freshly grated

8 ounces provolone cheese, freshly grated

1/4 cup finely grated parmesan cheese + more for garnish

4 (or more) garlic cloves, roasted and minced

1/4 cup freshly chopped basil leaves

2 tablespoons freshly chopped thyme leaves

1/2 tablespoon freshly chopped oregano leaves

crackers, bread or chips for serving

Preheat oven to 400 degrees F. Line a baking sheet with aluminum foil then place tomatoes on top. Sprinkle with olive oil and salt, then roast for 20-25 minutes, until bursting. Set aside.

While tomatoes are roasting, mix softened cream cheese with about 7 ounces each of provolone and mozzarella, then and parmesan. Stir in fresh herbs, garlic and roasted tomatoes, mixing well to combine. Transfer mixture to an oven-safe baking dish (mine was 6 x 4 round). Sprinkle with remaining provolone and mozzarella. Bake for 25-30 minutes, or until top is golden and bubbly. Serve immediately with crackers, chips or toasted bread.  I actually served this with the same foccacia I used for the Spinach Dip.

There now!  4 dips that you can break out at YOUR next get together- or anytime!  Let’s celebrate Tuesday with a mini party and some dips!

Happy Tuesday!  I’m off to eat- let me know what you think!

Cilantro Lime Chicken Bake

I’m someone who will try almost anything- seriously.  While I’m not as extreme as Andrew Zimmern or even Anthony Bourdain (and yes, Andrew is MUCH more extreme), I’m willing to give something a shot even if it seems weird.  I’m not sure why I’m so open to trying new things- my parents didn’t ever impress upon us that we needed to try everything or give all foods a fair shot; if anything, my mom would often recall her horror at having to eat liver and onions when she was younger, and I remember one particular wedding we attended where they were serving caviar and escargo (for the laymen- fish eggs and snails), and I was warned by my cousins to steer clear of the table.

Nope.  My ability to look past the odd and dive headlong into new waters is purely a ‘me’ thing, I think.  Like liver- I’ve never tried it, but I DO believe that -if its cooked well- perhaps it might not be so bad.  Usually what turns people off to something is texture, anyways, so maybe I’d like it.  If I ever try it, I’ll let you know.

Anyways, I say all this because I DO insist that my kids give all foods a fair shot and not to shoot something down just because it sounds weird or looks odd or has ingredients that won’t seem to work together- and even once they’ve tried something and written it off as “Do not ever eat again”, I STILL will make them try it again in the future.  Why?  Because tastes change.

Case in point- this dish.  I found it off Pinterest and Bug declared before ever taking a bite that he hated it.  Why?  Because it combined chicken and mangoes- a “no-no” in his book.  He fought me for a long time until I finally won the battle with “well, I’m not a short order cook, so you can try it and possibly like it, or you can go to bed hungry.”  In the end, he tasted it and loved it- even going back for seconds… and thirds. (Although, his pride kept him from ever REALLY saying he had been wrong in making a quick judgment.)  This is now one of our family’s favs.  Yeah, its a tad labor intensive, but every once in a while you should throw your clock out the window and just make something that will taste amazing.  This does- trust me.

Cilantro Lime Chicken Bake

Cilantro Lime Chicken Marinade (for 4 chicken breasts)
-3/4 c vegetable oil
-Juice and zest of 2 limes
-2 cloves garlic -2 tsp sugar
-1/2 tsp salt -1/4 tsp black pepper
-1/2 C finely chopped cilantro
*I put everything in blender and have it mix and chop it.

Cilantro Lime Rice
-1 cup uncooked rice
-1 can chicken broth
-1 cup water
-2 cloves garlic, minced
-1 Tbls freshly squeezed lime juice
-2 tsp sugar
-3 Tbls finely chopped cilantro
* Throw the rice, broth, water, garlic & some lime juice into a pot and let it cook. I also usually add a tbsp or two of butter to the pot to keep the grains of rice from clumping.  While it’s cooking I mix the sugar, lime juice & cilantro in a bowl. When rice is finished fluff the rice while mixing the sugar mixture into the rice.

Creamy Tomatillo Dressing
-1 batch prepared Ranch Buttermilk Dressing
-3-5 tomatillos (quartered)
-1 handful of cilantro
-1 jalepeno (optional)
-juice of 1 lime
-salt & pepper to taste
*Blend all ingredients in blender and chill for at least 2 hours before serving.
*This ranch is for drizzling on top of each slice of casserole after it’s been cooked right before serving.  And for salads.  And veggies.  And for licking off the spoon…

-You’ll also be using a small container of sour cream, Pepper Jack cheese and prepared Mango salsa. (Or you can make your own.)

Before you do anything, you need to prep the chicken with the marinade.  This makes it so it isn’t a “last minute meal” that you can just whip up, but -once again- its worth it.  And if you do this the night before, it’ll make your life easier the next day- and the flavors will be a LOT more intense.

Next on the list- and you can do this after you’ve prepped the chicken the night before, too- is making the dressing.  Its OH-so-tasty and it makes a LOT, so save it in an old jar in the fridge.  We loved it on salads the next day and with veggies as a snack.

The day of, make the rice and layer it on the bottom of your dish.  Grill your chicken (or cook it in a pan if you don’t have a grill) and shred it.  Put it all on top of the rice (with the exception of those few bites you probably stole while you were shredding).  Slather it all with the sour cream.

Next, cover the sour cream with the mango salsa.  How much you use is your choice, but I suggest making sure the whole dish is COVERED.  Its yummy and you won’t regret it.

Finally, cover the whole thing with a TON of the cheese.

Bake at 350 degrees until heated through (about 20 min). Then turn on broil until the cheese crisps a little.

When serving, drizzle tomatillo dressing on top and ENJOY!

Let me know how you like it!

Tasty Tuesday: Grinch Cookies

I’m a bit of a traditional gal.  I love traditions.  Traditions are the things that -long after you’re gone- your kids will remember because you did them every single year.  Maybe they’ll hem and haw about doing them (like the “traditional” Christmas photo) or maybe they’ll be giddy with excitement (like with a “traditional” movie night), but, in the end, they’ll look back someday and say,”Hey- remember when…?”

THAT’S what I want.  I want my kids to have these traditions so they’ll be able to look back on all the memories we’ve made, rather than focus on the hustle and bustle of Christmas seasons past.

In a day or so, I’ll post all the neato speedo things we’ve done thus far, but since its Tuesday, I thought I would post a recipe we recently used for our “Grinchy movie night”- the newest tradition I came up with after perusing Pinterest… again.

Oh, how I wish I could take credit for these.  Truly.  But I can’t.  I found the recipe HERE.

I mean, when it comes right down to it, the recipe is so simple that it makes me feel foolish that I never thought of it.  Although, now that I’ve made them, I’m already entertaining ideas for different versions for every other holiday.

Maybe a St. Patty’s Day cookie with Irish cream… 😉

Grinchy Cookies

INGREDIENTS:

  • 1 pouch (1 lb 1.5 oz) sugar cookie mix
  • 1/2 cup butter or margarine, softened
  • 1/4 to 1/2 teaspoon mint extract (I used 1/4 and it was perfect)
  • 6 to 8 drops green food color
  • 1 egg
  • 1 package Andes Mints
  • 1 cup semisweet chocolate chip

Heat oven to 350°F.

In large bowl, mix together the cookie mix, butter, extract, food color and egg until soft dough forms. Stir in chopped Andes Mints and chocolate chips.

Using small cookie scoop or teaspoon, drop dough 2 inches apart on ungreased cookie sheet.

Bake 8 to 10 minutes or until set (I’d check them a little before your timer goes off just to make sure they don’t burn).  Let them cool for about 3 minutes; remove from cookie sheet to wire rack. Store tightly covered at room temperature.

To make our Merry Grinchmas Movie Night a complete success, we paired these with Grinch Floats (Lime sherbet and Sprite).  They didn’t go together like milk does, but the Disasters were stoked that I was letting them stay up later than usual anyways AND giving them the cavity combo of soda, ice cream and cookies well after bedtime, so they didn’t complain.

And me?  I was just happy as a clam, snapping photos of my punks, eating cookies, drinking sugar, and soaking in all the memories that were being made.

Heavenly Spaghetti

This has a longer name- one that points out all the great reasons to eat it- but when you break it down, this name just kind of sums up.  I mean, really now, who wouldn’t love something with garlic, chicken, roasted tomatoes…

I’m making myself hungry.

Anyways, since you all know I’m a Pinterest junkie, I found the idea for this off there.  The problem I encountered, though (which, I’m sure you’ve all been in this situation), was I saw the picture, started to drool, and when I clicked on the link, it led to that person’s front page of their blog.  I looked for the ACTUAL recipe everywhere, but all I saw was the picture.  Not cool.

So, I started to mess around and came up with something that made me happy, and -BONUS- it made all the rest of Boystown happy, too.

Heavenly Spaghetti

Ingredients:

~12 oz spaghetti pasta (cooked al dente)

~1 pound chicken breast fillets (sliced into 1 inch chunks) (or 2 large b/s breasts)

For the chicken marinade:

~2 teaspoons fresh thyme, chopped

~2 teaspoons fresh rosemary, chopped (if using dried, use half of the amount)

~Zest of 1 lemon

~Juice of ½ a lemon

~2 Tablespoons extra virgin olive oil

~1 teaspoon coarse salt (not table salt)

~½ teaspoon fresh cracked black pepper

~1/2 tsp red pepper flakes

~2 Tablespoons extra virgin olive oil (to sauté the marinated chicken)

Add all the marinade ingredients into the chicken and marinade for 20 minutes (if you need this dish right away) or over night (if making this dish the next day… much better).

Saute the marinated chicken in extra virgin olive oil until cooked (about 4-5 minutes) then set aside

For the garlic gravy: (Preheat over to 400 degrees)

~½ stick (1/4 cup) unsalted butter

~4 large cloves garlic, finely minced

~2-3 Tablespoons all-purpose flour

~2 ½ cups chicken stock

~1 Tablespoon fresh basil, chopped

~salt and pepper to taste

~¼ cup parsley, chopped (to sprinkle/finish the pasta)

~½ cup grated parmesean cheese

~3 cups of cherry tomatoes, halved, or 3 cups of tomatoes, cut into 1 in. diced pieces

Toss the tomatoes lightly with olive oil, salt and pepper on a sheet pan. Spread them out into one layer and sprinkle generously with kosher salt and pepper. Roast for 15 to 20 minutes, until the tomatoes are soft and slightly carmelized.

Place sauté pan (you used for the chicken) over medium heat. Add enough olive oil to make up 2 tbsp of oil in the pan (if there wasn’t enough left over from cooking the chicken) and add butter.

Saute garlic until fragrant. (About a minute. You don’t want it to burn.)

Add the flour and cook for a minute. You want a 1-1 ratio of oil to flour, so if you think you need to add a little more flour than 2 tbsp to keep that ratio, then do so.

Add chicken stock and simmer gravy until thickened then add the chopped basil.

Season with salt and pepper (if needed).

Add the sauteed chicken and tomatoes in the gravy then toss the cooked spaghetti into this  sauce.

Finish the dish with the chopped parsley and grated parmesan cheese (serve extra on the side).

Now, I’m not one to pat myself on the back, but…

Oh, wait.  Yes I am.  Try this, though, and you’ll be sending me a virtual pat on the back, too.

And, hey- if you like it, let me know and PLEASE pin me.  Tell the world that this recipe rocks!  Yummy goodness like this shouldn’t be hidden.

7-up Biscuits

Yes, you read that right.  ‘7-up biscuits’.

I know.  I know.  I thought it was weird when I first heard about them, too, but the reviews on Pinterest intrigued me and I knew it was something I had to try.

Of course, once again, I encountered… issues.

Why in the world do people pin these FANTASTIC looking recipes from sites that ONLY allow you to post pictures?  Its a tease!  Its wrong!  Its oh-so-very wrong.  Food -pardon the expression- is my *ahem* porn.  I LOVE watching the Foodnetwork the way some people watch XXX videos.

However.

I’m one of those people that actually DOES read the magazines for the articles.

The food magazines.  Not those other ones.

Anyways, all that to say that I hate when I see a tasty looking recipe and there’s nothing else.  Not that it deters me, but it just causes more work for me before I can devour something yummy.

So, I looked online, and -wouldn’t ya know it?- this is actually a really well known thing!  I tried it out, and now I’m hooked.  I would eat them with gravy.  I would eat them with butter and honey.  I would eat them by themselves.

I would eat them in a box.

I would eat them with a fox.

Sorry.  Dr. Suess moment.

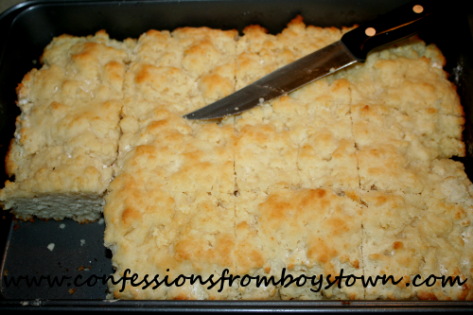
So, for all you food porn junkies, here’s a pic AND the “article”, if you will.  Enjoy, and you’re welcome.

7 UP (or Sierra Mist) Biscuits
4 cups Bisquick
1 cup sour cream
1 cup 7-up
1/2 cup melted butter

Cut sour cream into biscuit mix. I used my stand mixer, but you can use a fork. You just want to keep the sour cream from scooting around the bowl instead of mixing in.

When its mixed in, it will look kinda crumbly. Add 7-Up. This will bring it all together and make a very soft dough.

Sprinkle additional biscuit mix on board or table and pat dough out.

Pour melted butter into a 9 x 13 inch pan. Place biscuit dough in the pan, pressing down SOFTLY a little more (it helps to sprinkle a little Bisquick on top to keep the dough from sticking to your fingers). It won’t fill the pan completely but that’s ok. It will spread out as it bakes.

(Doesn’t it look pretty already?  And this is pre-baked!)

And, because I’m not healthy in the LEAST, I basted the whole thing with melted butter.  Yes, I did.

Bake at 450 degrees until golden brown. (about 12-13 minutes)

Now, go.  Flee to your kitchen and make a batch.  Or two.  Or 10.  They’re so easy that the only problem you’ll encounter is you’ll eat them all in one sitting.  I promise.  I couldn’t even wait to take the picture before tearing into them- hence, the missing square.  Actually, these would make a GREAT delivery system for all that leftover turkey you have from Thanksgiving.  Maybe later I’ll post a recipe for sausage gravy to go with these.  In the meantime, go get a check up from your doctor to ensure you won’t die from all the amazing pork fat.

Oh, and if you try these and you love them, PIN ME!  Yes, I’m a little bit narcissistic.  Just think of it as you saving the world from pointless pictures of food that go nowhere.

Tasty Tuesday: Bow Tie Sausage Skillet

I’m a sucker for pasta.  Its kinda amazing, and if you give me half a chance I could probably give you a few reasons why pasta could be the answer to world peace.

Don’t believe me?

Ask yourself this- have you ever seen anybody ANGRILY eating pasta?

Yeah.  I thought not.

So, needless to say, sites like Pinterest help feed my addiction- literally.  Search for “pasta” and you’ll pinning for hours.  I found a version of this and I knew it was something I had to try out on my family.  I messed with it a little to suit what my family likes, and voila!

Ingredients

2-3 cups bow tie pasta
About a lb of sausage (you can use sausage links, too, if you can’t find bulk sausage- just take them out of their casings)
1 bell pepper, sliced
1 onion, diced
¼ teaspoon red pepper flakes (or more- my family can take spicy, so I actually added closer to 3/4 tsp)
¼ teaspoon pepper
2 dashes salt
¼ cup water
1 teaspoon dried oregano
1 can cut tomatoes (14.5 ounces)
2 tablespoons cut fresh parsley (or 2 teaspoons dried parsley)
About 2 cups of shredded mozzarella
About a cup of ricotta
parmesan cheese

DIRECTIONS:

Boil the bow tie pasta until it’s al dente.

Heat a large skillet on medium heat and add the sausage. Cook till its in med. sized crumbles. If you’re using links, you can save time by squeezing out 1 in. pieces out of the links into the pan.

If you’re using turkey sausage or something low fat, you might want to add a bit of olive oil to add moisture.  Yes, you WANT fat in this dish.

As the sausage is cooking, add the onions and bell peppers.  Oh, and I also added about 2 cloves of minced garlic.  If you like garlic, feel free to add it in.  If not, don’t.

Then, add the red pepper flakes, and the pepper.

Add the oregano, and salt. Gently stir all of the ingredients in the skillet together.

Then, add the cut tomatoes and water.

Stir all of the ingredients together.

Add just 1 tablespoon of the parsley; reserve the other tablespoon for garnish.

Add the drained al dente pasta, and gently stir the ingredients together.

Add ricotta to the pan. Mix in a bit to help it melt.

Add mozzarella on top of the ingredients.

Sprinkle the parmesan cheese on top.

Cover the skillet with a lid and let simmer until the mozzarella cheese is melted (about 5 minutes).

Lastly, garnish with parsley.

Serve hot right out of the skillet.

Enjoy!  Let me know what you think!

Tasty Tuesday: Kahlua Chocolate Cheesecake

So, last Tasty Tuesday I told you I’d share 2 of my versions of favorite dishes from one of my FAVORITE restaurants- The Cheesecake Factory.  If you still haven’t made that dish I gave you, well, that’s a bloody shame.  Its good.  Its REAL good.  As I type, I’ve got leftovers from the batch I made yesterday, and – although I had it for lunch- I’m contemplating having it for dinner.

But, that’s not what this week’s Tasty Tuesday is about.

THIS week, I’m going to share with you happiness.

THIS week, I’m going to share with you a good day in creamy, goodness-y (yes, its a word) form.

THIS week, I’m going to share my recipe for my version of their Kahlua Cocoa Coffee Cheesecake.

Like every other time, like I said, I searched the internet for a fabulous homemade rip off version to help quiet my craving, but after trying a couple of these poor excuses for replacements, I came up with my own.  That’s right- its all mine.  Pretty proud of myself, if I may say.

Now all I have to do is remind myself that just because I CAN make this fantabulous version at home whenever I want, I shouldn’t.  My taste buds thank me, but my waistline is NOT on speaking terms with me at the current moment.

Sooooo… you ready?  Good.  Here’s the recipe:


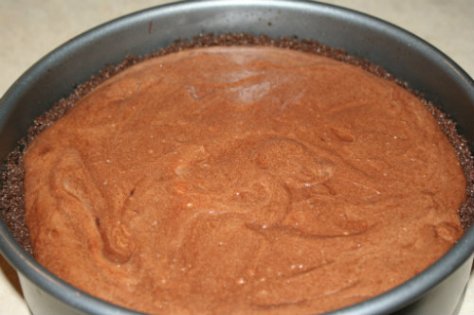
Kahlua Chocolate Cheesecake

Crust
10 chocolate graham cracker rectangles, broken up and pulverized… what?  Too harsh?
5 tbsp. butter, melted
1/4 cup sugar
1 tbsp instant coffee granules
Cheesecake
1 1/2 cups semi-sweet chocolate chips
1/4 cup Kahlua or 1/4 cup coffee-flavored liqueur
2 tablespoons butter
2 eggs
1/3 cup sugar
1 tbsp flour
1/4 teaspoon salt
1 cup sour cream
2 (8 ounce) packages cream cheese, softened
Directions:
Before beginning, let the eggs, cream cheese, and sour cream come to room temp for around 4 hours.  This is VERY important.  Do NOT skip this.
Preheat oven to 350F degrees.
Prepare chocolate crumb crust and press firmly into a nine-inch springform pan.  I like to use a straight edged measuring cup to really pack the crust down and help with pacing down the sides- something that can be kind of difficult to do normally.  Bake for 5-7 minutes.  You’ll be able to smell when its ready, but if not, don’t let it go over 7 minutes.  Set it aside to cool.
In a small saucepan over medium heat, melt the chocolate with the Kahlua and butter; stir until smooth.  Try not to eat just that.  You’ll need it all for the cheesecake.  Now set it aside.
Using a stand mixer with a paddle attachment, beat the room temp cream cheese with the sugar and salt at med./low speed until smooth and fluffy (about 2 minutes).  You can do this using just a really good hand mixer, but I like my stand mixer best.  It takes less time and less work.  It CAN be done without a stand mixer, though, so you have that option.
Next, beat in the flour on LOW, followed by the eggs- one at a time, and mix only until each egg is fully incorporated.  Scrape the bowl and add in the sour cream.  Once again, only mix until its fully incorporated.  Gradually blend in chocolate mixture.
Pour into prepared crust and bake for 35 minutes or until filling is barely set in center.
Turn off heat and let stand in oven for 15 minutes with door open; then take out of oven and let stand at room temperature for one hour. Refrigerate several hours or overnight.
Garnish with a spoon.  Ok, maybe some whipped cream and chocolate shavings would be nice.  A chocolate ganache would probably be pretty tasty, too, but I never got that far.  I dove into it the moment I was able.
Enjoy!  Let me know what you think!
Tasty Tuesday: “Evelyn’s” favorite pasta

We don’t go out that often.

Apparently, trying to offer up your kids as payment for a meal at restaurants is frowned upon and looked at as “wrong” and “poor parenting”.

Anyways, when we DO go out, one of my FAVORITE places to go is The Cheesecake Factory.  If you’ve never been there, I pity you- but never fear!  For the next two ‘Tasty Tuesdays’, I’m going to share MY recipes for two of my favorite dishes there.  Its one of my favorite things to do- figure out a way to make my favorite meals or items from favorite restaurants at home.  Even better is when Corey and I can work together to make the dish- bonus!

Anyways, on one of mine and Corey’s date nights, I tried a dish at The Cheesecake Factory (Evelyn’s Favorite Pasta) without even really knowing I had ordered a vegetarian meal.  Maybe not a big deal to some of you, but if you’ve learned ANYthing about me, you should know that I am NOT a vegetarian.  I’m actually under the mindset that God gave the world pigs JUST so I could have bacon.

This is all beside the point, though.  It wasn’t until I was gushing to the hubs about how yummy the leftovers were going to be, that my hunny said,”Yeah, maybe, but I need meat in my meals.”  I hadn’t even realized this was sans meat- it was THAT good.

So, I wrote down the ingredients and decided to wing it.  I think it came out pretty fabulous, if I DO say so myself.

The following is Amber’s Fantabulous Pasta.  I’m allowed to change the name since I’m not TECHNICALLY copying it.  I’m sure they did some sort of C.F. magic to make it a tad bit better.

1 can of NON marinated artichoke hearts

1 small bag of pine nuts, roasted

1 large eggplant, cubed and roasted on a sheet til soft

1 red bellpepper, roasted and cut into strips

1 small bag of sundried tomatoes, chopped

1 med. bag of broccoli florets, steamed

a container of Kalamata olives, halved

a few cloves of garlic, minced

a med. bag of penne pasta, cooked to your preference

Toss it all together with some olive oil, salt, pepper, fresh Rosemary, and oregano.  And don’t even THINK about digging in til you’ve added parmesean.

And, if you’re stomping your foot and saying,”Nope.  Not gonna happen.  No meat?  No way.”  Well, just add some meat.  Chicken would probably be pretty yummy in this.  I don’t think you’ll need it, though.

Oooo- roasted mushrooms would be AMAZING, too!

Now eat up.  You can thank me once your mouth isn’t full.

And, FYI- the leftovers of this dish were just as good.

***Tiny tip: If you’re wondering about the whole “roasting thing”, here are some pointers***

For the eggplant:  Preheat oven to 400 degrees.  Cut the eggplant in half and then slice a diamond pattern in the flesh.  Sprinkle salt over both sides and try to get salt in the sliced pattern (about 1 1/2 tsp. total).  Set the halves aside for about 30 minutes to draw out all the moisture. While you’re waiting, line a baking sheet with parchment or foil.  When the time is up, gently squeeze out the moisture and pat the sides dry.  Brush the sides with olive oil (about 2 tsp. total), place on the baking sheet flash side down, and roast for about an hour.  You’ll know its ready when the eggplant has kind of collapsed and the bottoms of the sides have turned a deep caramel color.  Once they’re cool, scoop out the flesh.  It should come out diced and ready to go.

For the roasted bellpepper:  Peel it as much as possible with a veggie peeler, scrape out the insides, and cut it into 1/4-1/2 strips.  Toss with olive oil and roast with the eggplant on a separate baking sheet.  It should only take about 30-50 minutes to reach the right tenderness.

For the pine nuts:  Roast your pine nuts on a baking sheet in a 350 degree oven for about 10 minutes, shaking halfway through. You can also toast them on top of the stove in a heavy skillet, stirring often until they turn golden.

Tasty Tuesday: Spanish Rice

Ok, no more stalling.  I told you last week and the week before that I’d give you a great recipe for Spanish Rice, so here ya go.

I’m kinda excited to share this recipe.  Its not very often that you’re given a fantastic recipe that has been passed down through the years, and yet, hasn’t been messed with.  This dish is found at EVERY Christmas gathering I’ve spent with my husband’s family, and its the reason I went on a quest to find the best Spanish rice for a meal I was making a while back.  Funny thing, though, none of the dishes came out right until I finally asked about this recipe.  I made this the first time, and I knew there was something special about it.  I shouldn’t be surprised- there was something special about the man it originated from.

When I got this recipe (via my sister in law who got it from our late grampa in law), she had just forwarded the email he’d sent to her.  In it, he said that the recipe was over 100 years old, and during hard times, they had used water instead of chicken broth.  Since I LOVE recipes with a little bit of history (Aren’t you proud, dad?  I’m fond of SOME sort of history!), I’m going to post the recipe as it was given to me.

Of course, since I’m also a bit on the wild side, I’ll let you know of the few changes I made. 🙂

Now, like I’ve said before, I get it- making things from scratch is time consuming and not always cost effective.  On the plus side, though, its usually healthier (at least, when someone besides ME is making it. 🙂 ), and you can pat yourself on the back in knowing that you put more love into your family’s meal than normal…

Did I mention that its usually healthier?

Besides all that, this recipe is oh-so-yummy, so I know you’ll love it as much as Boystown does.  Trust me.

Grampa’s Dry Rice Soup (Sopa Seca de Arroz) (Spanish Rice)

1 cup UNCOOKED rice

1 clove garlic

1/2 cup olive oil

2 tbsp minced onion (I use 1 small onion, minced)

3 tbsp tomato sauce

2 1/4 cups BOILING water (you can use chicken broth)

salt and pepper to taste

***I also add 1/2 a jalapeno, seeded and minced***

Brown garlic in oil, remove from pan, and throw away.  DO NOT USE MINCED GARLIC!  Trust me.  I know some of us are fond of our garlic, but if you add minced garlic, it will burn and taste nasty.

Add the rice and fry it until its golden brown

Not my picture, but this is what ‘golden brown’ looks like.  Just thought you should know.


Add onion, tomato sauce, jalapeno (if you choose), boiling water (or broth), season and  cover tight.

Cook slowly on LOW for 30 minutes.

DO NOT PEEK BEFORE THE TIME IS UP!!!

Ok, now, take your rice and eat it.  Whether or not you wait for your family is up to you.  Whether or not you eat it alone or with the beans and Chili Verde I gave you the recipes for is also up to you.  Heck, taking the dish and eating it in the confines of the closet is also up to you- weird, and could send out warning signs that you should seek help- but highly justifiable to anyone who tastes this.  Trust me.

Enjoy, and you’re welcome. 🙂

Tasty Tuesday- Refried Beans

As I said last week after giving you the AMAZING Chilie Verde recipe, if you want a TRULY fantastic fiesta, you need to finish it off with sides- rice, tortillas, salsa… and refried beans.

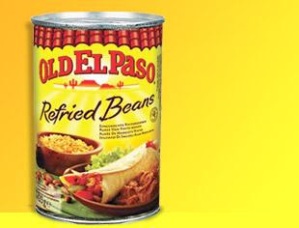
Most of you probably just pictured THIS

and do I blame you?  No.  Honestly, canned is good in a pinch.  I remember catering my friend’s son’s 2nd birthday and after spending a LONG time making fresh refried beans, Camo picked up the tray the wrong way and the whole thing dumped out.  Making more was out of the question.  Luckily, my friend is forgiving and she sent her hubby to go buy some beans.

I learned something from that experience- use a cookie sheet under flimsy trays of heavy beans.  I was embarrassed, but, like I said, canned came through when I needed it.

However, if you have the time, the difference is HUGE and you’ll be happy.  Trust me.

Refried Beans

2 cups dried pinto beans, soaked overnight w/ water to cover by about 2 in. (if you forget this step, you can do a quick soak by covering the beans with HOT water, letting it come to a rapid boil for 2 minutes, removing it from the heat, and letting it sit for about 1 hour.  When its doen, empty the water, rinse, and follow the recipe as usual.)

1 bay leaf

3/4 c bacon fat or lard

2 c yellow onions, chopped

1 1/2 tbsp garlic, minced

1 1/2 tbsp seeded and minced jalapeno

1 1/2 tbsp chili powder

2 tsp cumin

1 tsp salt

1/4 tsp cayenne

1 tsp oregano

1 tsp coriander

salt to taste

Combine beans, bay leaf, and enough water to cover by 1-2 inches.  Bring to a boil and then reduce it to a simmer UNCOVERED (unless you like to clean your stove up.  Just sayin’), stirring occasionally until  the beans are tender.  Very tender.  Maybe you like your pasta to be al dente, but generally, refried beans don’t have any bite.  Anyways, this could take anywhere from 1 1/2 -2 1/2 hours (maybe even longer if you only did the quick soak).  Add water as necessary to keep the beans covered.  When the beans are nice and soft, mash ’em up with a tator masher.  Remove the pot from the heat.

In a med. skillet, heat the bacon fat/lard over med./ hi heat.  Add the onions and cook about 4-6 minutes.  Add the remaining ingredients and cook 1 minute.  Add to the beans and stir to combine.

Cook about 15-20 minutes more over med. heat, adding a little water as necessary to keep the beans from drying out.  Taste it to see if you need to add salt.  If not, you’re done.

These are so tasty you might just decide its a meal by itself.  If you’re having a hard time justifying that, just ask me and I’ll be happy to help you find a way.

Add some cheese, maybe some scallions- yum.  Use for your Mexican fiesta as a side dish, or use it to top a tostada shell (they sell ’em in the Mexican aisle in the market).  Add some thinly chopped lettuce, tomato, and cheese and you’ve got a quick dinner- and I should know- I did this a few nights in a row when we were swamped with things to do around here.

Next week, I’ll give you a great recipe for Spanish rice.  The recipe is from my late grampa-in-law who said it was over 100 years old.  If THAT’S not enough to get you to come back, well, its also a WONDERFUL addition to the Chili Verde meal.

Yeah- that’s what I thought.  I’ll see you next week. 🙂